This article will cover the following:
- How to integrate Lincx as a 3rd party tracking system with Cake
- Integrate Lincx by using a Cake Wrapped Setup
Before integrating Lincx with Cake, you will need to verify how you want your conversion tracking set up:
- If you are working with Lincx to manage your Ad zones, and you are using Cake’s tracking system to manage both your downstream Affiliates and upstream Advertisers, then continue with this guide.
Before connecting Lincx with Cake.
To maximize your utility with Lincx, your familiarity with how Lincx conversion tracking works is a prerequisite before preceding. You will want to validate the expected tracking and conversion behavior before connecting both systems. When you have placed your Lincx script on your site (with one or more ads targeting the zone), you are ready to start the integration.
To test Lincx in stand-alone mode. Watch the stand-alone tracking video first.
Introduction
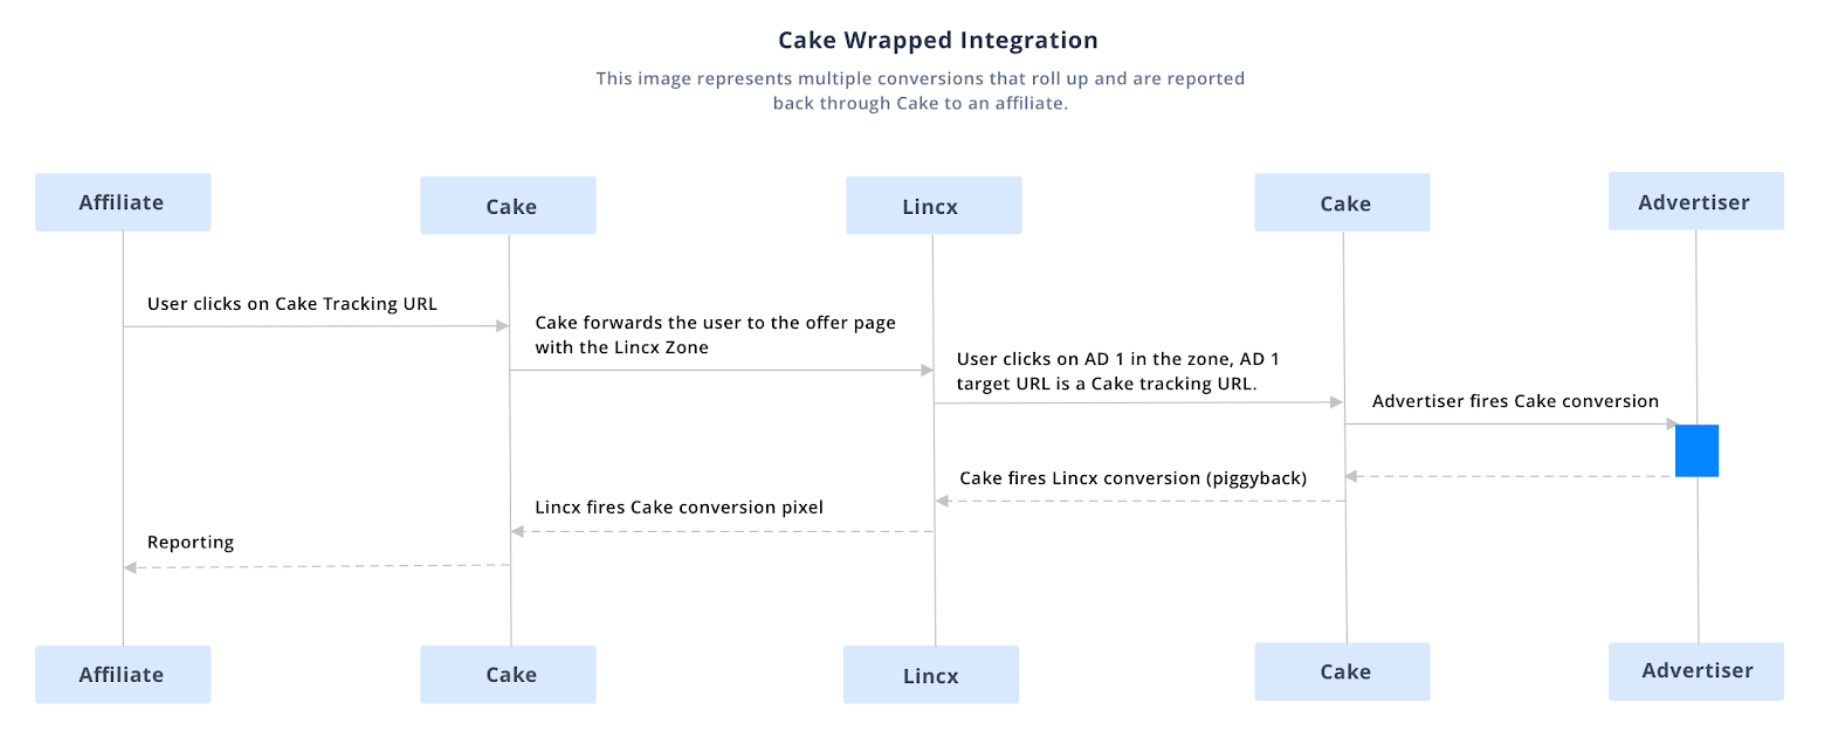
In this guide, we will walk you through how to use Lincx with Cake. Lincx is very flexible and can be integrated depending on the desired setup. Ultimately, this boils down to whether or not the Affiliates and/or Advertisers will have direct integration with Lincx.
Generally Affiliates and Advertisers are already integrated with Cake, so it is easier to leave them that way. To achieve integration, Lincx is “wrapped” by Cake on both sides. This allows existing Affiliates and Advertisers to remain integrated directly with Cake, while making any unnecessary changes on Cake’s end.
How does it work? The Cake "Wrapped" Setup
Before we continue, please make sure that you have a complete Network. Follow the Network Setup Guide if you would like an example.
Before adding Lincx, let’s demonstrate how you will introduce an additional layer within Cake. Once you are comfortable with adding another layer, adding Lincx between the two layers will be simple.
Imagine creating two new accounts: one Advertiser and one Affiliate. We will call them both “Lincx.”
- For the new Lincx affiliate account, we will create a new Campaign and generate a new tracking link for an existing Offer (non-passthrough).
- Next, we will take our new tracking link from above, and within the new Advertiser account, we create a new Offer called “Lincx Offer.”
- The newly created tracking link will be the Offer’s landing page.
- Finally, we take the offer’s conversion pixel and place it in the postback section of the Affiliate’s Ad Campaign.
Cake "Wrapped" Setup: Adding Lincx within Cake
Similar to the example above, we will add two Lincx accounts to Cake: one Advertiser and one Affiliate.
The Advertiser account will have an offer that redirects to where the Lincx Zone is hosted. This offer can be used to create tracking links for your existing Affiliates.
The Lincx Affiliate account will be used to:
- Create tracking links for your existing offers (to be used within the Lincx platform)
- Use postbacks to relay conversions back to the Lincx platform.
Notice the similarities to the passthrough setup example above:

What we are aiming to achieve is that all the individual campaigns will roll up into a single offer inside Cake. This will allow you to manage your Affiliates with Cake. From the perspective of Cake, the Lincx Zone (the page with Lincx zone placed) will be an offer. Since we will be having multiple Advertisers (ad campaigns) targeting the Lincx zone, we will first need to set up Lincx as an Advertiser within Cake.
Step 1: Create "Lincx" as an Advertiser in Cake and then Create the Lincx zone page destination as an Offer.
To send traffic from an Affiliate to your landing page with a Lincx Zone, we need to create a new Advertiser within Cake as follows:
- Click on the Advertiser main tab. Next click on the Advertiser sub-tab. Click on the Add Advertiser button.
- The Add a New Advertiser wizard will open.
- All that is required is naming the Advertiser. Under the name field, enter Lincx.
- Click Next and then select Finish.
For more details on how to add an Advertiser in Cake check out: https://support.getcake.com/support/solutions/articles/13000050221-how-to-add-an-advertiser
Step 2: Next you will create the Lincx Zone page as an Offer.
- Navigate to the Offers sub-tab under the Advertiser we just named Lincx.
- Click Add Offer and a wizard will walk you through the required information:
Refer to Appendix: Setting up Multiple Conversions/Events at the end of this guide for more details on how to configure your Landing Page URL
- Name: Name should correspond to the Zone you are creating in Lincx
(i.e. Lincx Auto Insurance) - Vertical: (i.e. Auto Insurance)
- Advertiser: (Lincx)
- Status: Depends if you want to make the offer available to your affiliate portal. If you are unsure, we suggest starting with Private.
- Offer Type: 3rd Party
- Price Format: CPA - Dynamic value on the pixel.
- Payment Model: Last touch or first touch
- Received: Need to figure out multiple events
- Landing Page URL: The URL of the page is where the Lincx zone is hosted.
- Click Next and then select Finish.
For more details about how to add an Offer on Cake: https://support.getcake.com/support/solutions/articles/5000545912-how-to-add-an-offer
When you are completely set up, you'd then create tracking links for your affiliates to target your new Lincx offer. However, we still next need to make sure your offers that are targeting the Lincx zone are set up correctly.
Step 3: Create Lincx as an Affiliate in Cake
For the purpose of the next part of this guide, we will assume that your existing Affiliate accounts are already created and set up properly.
Lincx does not require any special setup for an Affiliate account within Cake. To create a new Affiliate in Cake:
- Hover over the Affiliates main tab. Next hover over the Affiliates drop-down, and then click on Add a New Affiliate.
- The Add a New Affiliate wizard will display.
- Under Name, enter Lincx. This will be the name of your Lincx Affiliate. You are not required to add in any additional information.
- Click Next and then select Finish.
For more details in how to add an affiliate on Cake: https://cakemarketing.screenstepslive.com/s/6071/m/20936/l/211093-how-to-add-an-affiliate
Step 4: Create an Ad Campaign in Cake to target your new Lincx zone.
A campaign is the unique relationship between an Affiliate and an Offer. To create an Ad Campaign:
- Open either an Affiliate or Offer card
- Click on Campaign tab
- Click Add Campaign button
- Follow the Campaign Creation wizard to enter the necessary details
- Select the Affiliate (Lincx)
- Select the Offer (i.e. the offer that will be targeted to the Lincx zone.)
- Select Media Type: Banner (or Other types)
- Assign Price: Default will be there.
- Assign Status: Active
- Click Next and then select Finish.
Lincx should already be pre-populated. Now you have your Ad Campaign built out.
For more details in how to add a Campaign in Cake: https://cakemarketing.screenstepslive.com/s/6071/m/20936/l/210956-how-to-add-a-campaign
Step 5: Enable Events
In Cake, events are user actions that can be tracked "pre" or "post" conversion. We will need to enable events in Cake to enable multiple conversions to sync with Lincx.
https://support.getcake.com/support/solutions/articles/5000546121-how-do-i-track-events-
Step 6: Generate Unique Tracking Link
A unique tracking link in Cake is a campaign-specific URL used by Affiliates to redirect the users to an offer's landing page. You will generate this unique tracking link to place in your creative within Lincx.
- From the offer card, click on Campaign tab
- Select the Lincx Ad Campaign we just created to generate our unique tracking link
- Press the Generate Link
- Follow the Generate Unique Link Wizard and complete the following fields and then press Next:
- Affiliate
- Campaign
- Creative
Your Unique Tracking Link will look like the following example:
https://trk.example.com/?a=123&c=2345&s1=
For more details on how to generate a Unique Tracking Link in Cake: https://cakemarketing.screenstepslive.com/s/6071/m/20936/l/187688-how-do-i-track-clicks
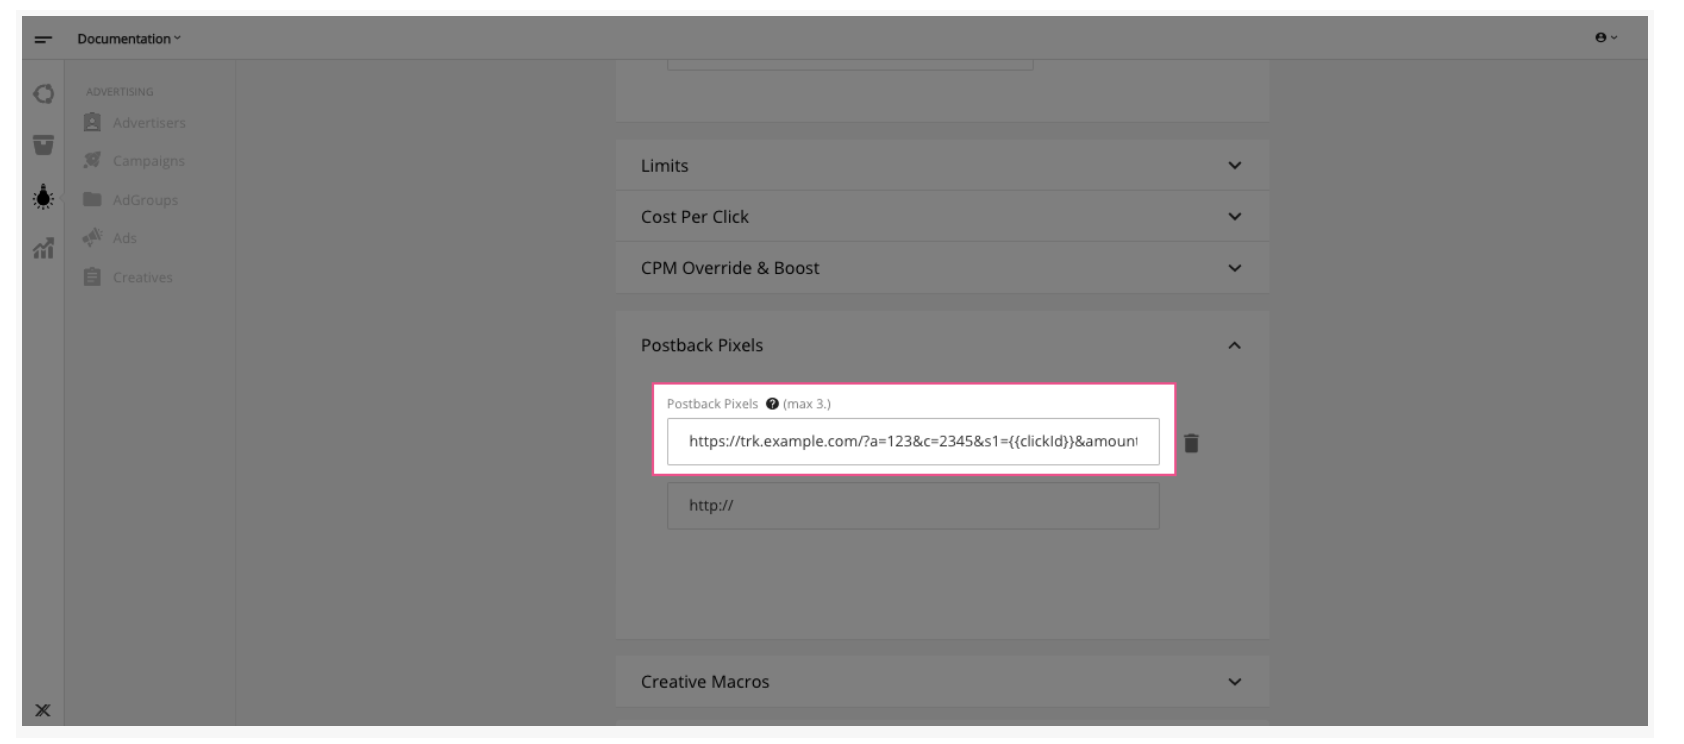
Step 7: Adding your Unique Tracking Link as postback pixel in Lincx Ads
1. This link will contain a few parameters. We are going to configure this URL to:
https://trk.example.com/?a=123&c=2345&s1={{clickId}}&amount={{price}}&transaction_id={{transaction_id}}
Your tracking domain, path, and offer will be different, but be sure that s1 is set to {{clickId}}, amount is set to {{price}}, and transaction_id is set to {{transaction_id}}.
2. In Lincx, navigate to the Ads subtab under Advertisers: 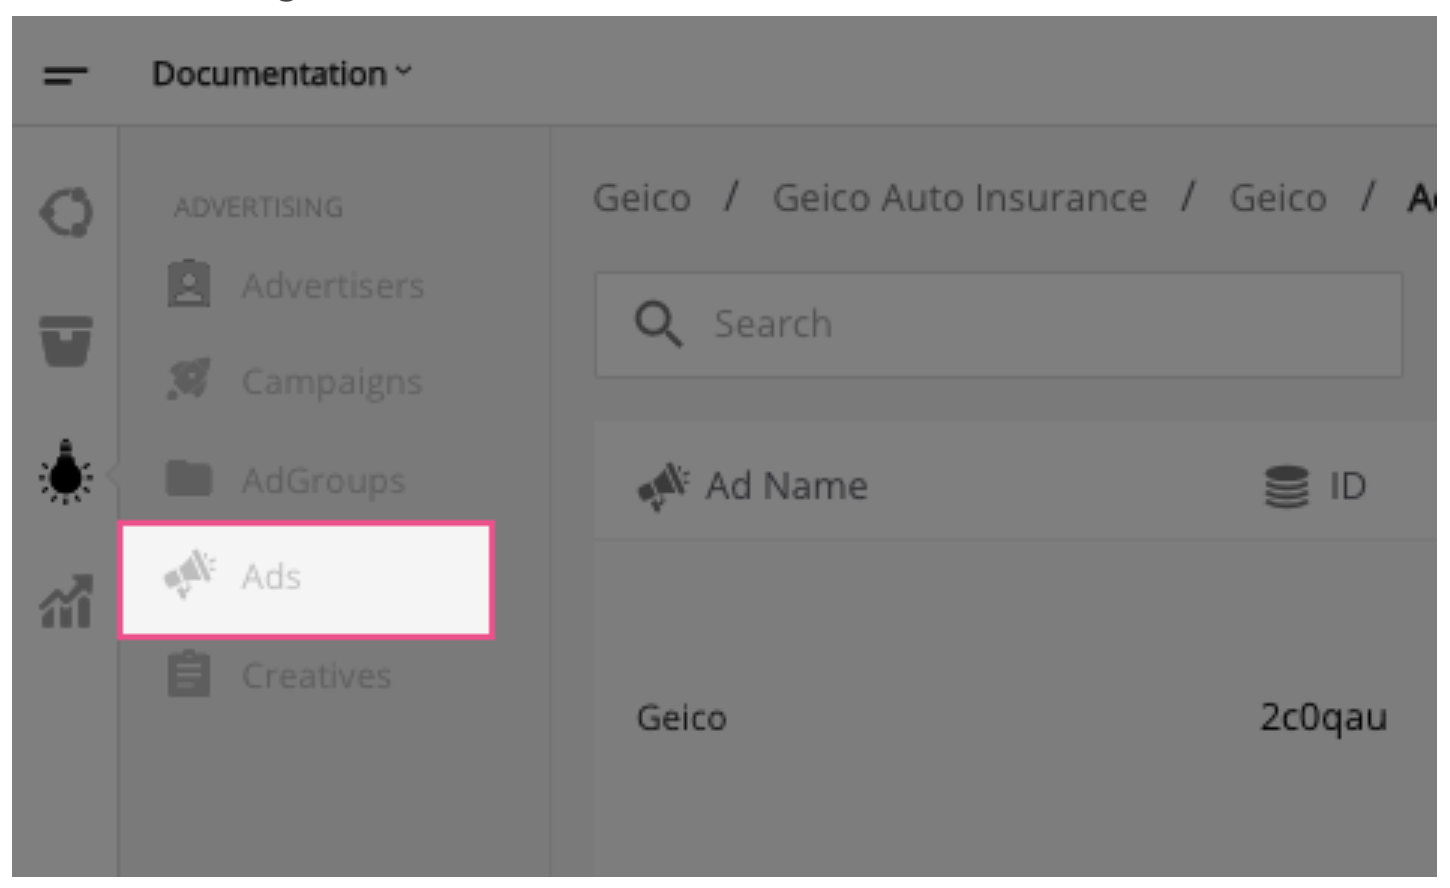
3. Next you will select the "Edit" icon from the action menu:
4. Then you will add our edited Cake conversion URL to the postback pixels.
Here is the edited URL from above:
https://trk.example.com/?a=123&c=2345&s1={{clickId}}&amount={{price}}&transaction_id={{transaction_id}}
At this point, any individual offer’s conversion will propagate through Cake, and Affiliates will see the proper reporting.
Step 8: Generate the Postback URL
In Cake we will need to generate an Offer Conversion Pixel to find our postback URL. We will use this postback url as a postback pixel for our Lincx Zone.
Make sure that you have the correct Lincx Zone Offer selected (i.e. Lincx Auto Insurance).
- Under the Home tab, click on the Pixel button.
- Select Conversion/Install/Lead
- In the wizard, select Include Request Session ID:
- Press Next, and you will be using the Postback URL. Your postback URL will look something like the following:
https://trk.exampleurl.com/p.ashx?o=123&e=543&f=p&r=REQUEST_SESSION_ID&t=TRANSACTION
Note: tracking type should be standard.
For more details about generating the postback URL on Cake: https://cakemarketing.screenstepslive.com/s/6071/m/20936/l/466737-how-do-i-track-conversions
Step 9: Adding Cake’s s2s Conversion URL as postback pixel in Lincx Zone
At this point, we have created tracking links for each of our Cake Affiliates, and we have verified that they lead to the correct page from our Lincx Zone.
Our last step is to add the Cake’s Server 2 Server (s2s) Conversion URL as a postback pixel on our Lincx Zone.
1. In Lincx, navigate to the Zones subtab under the Inventory list: 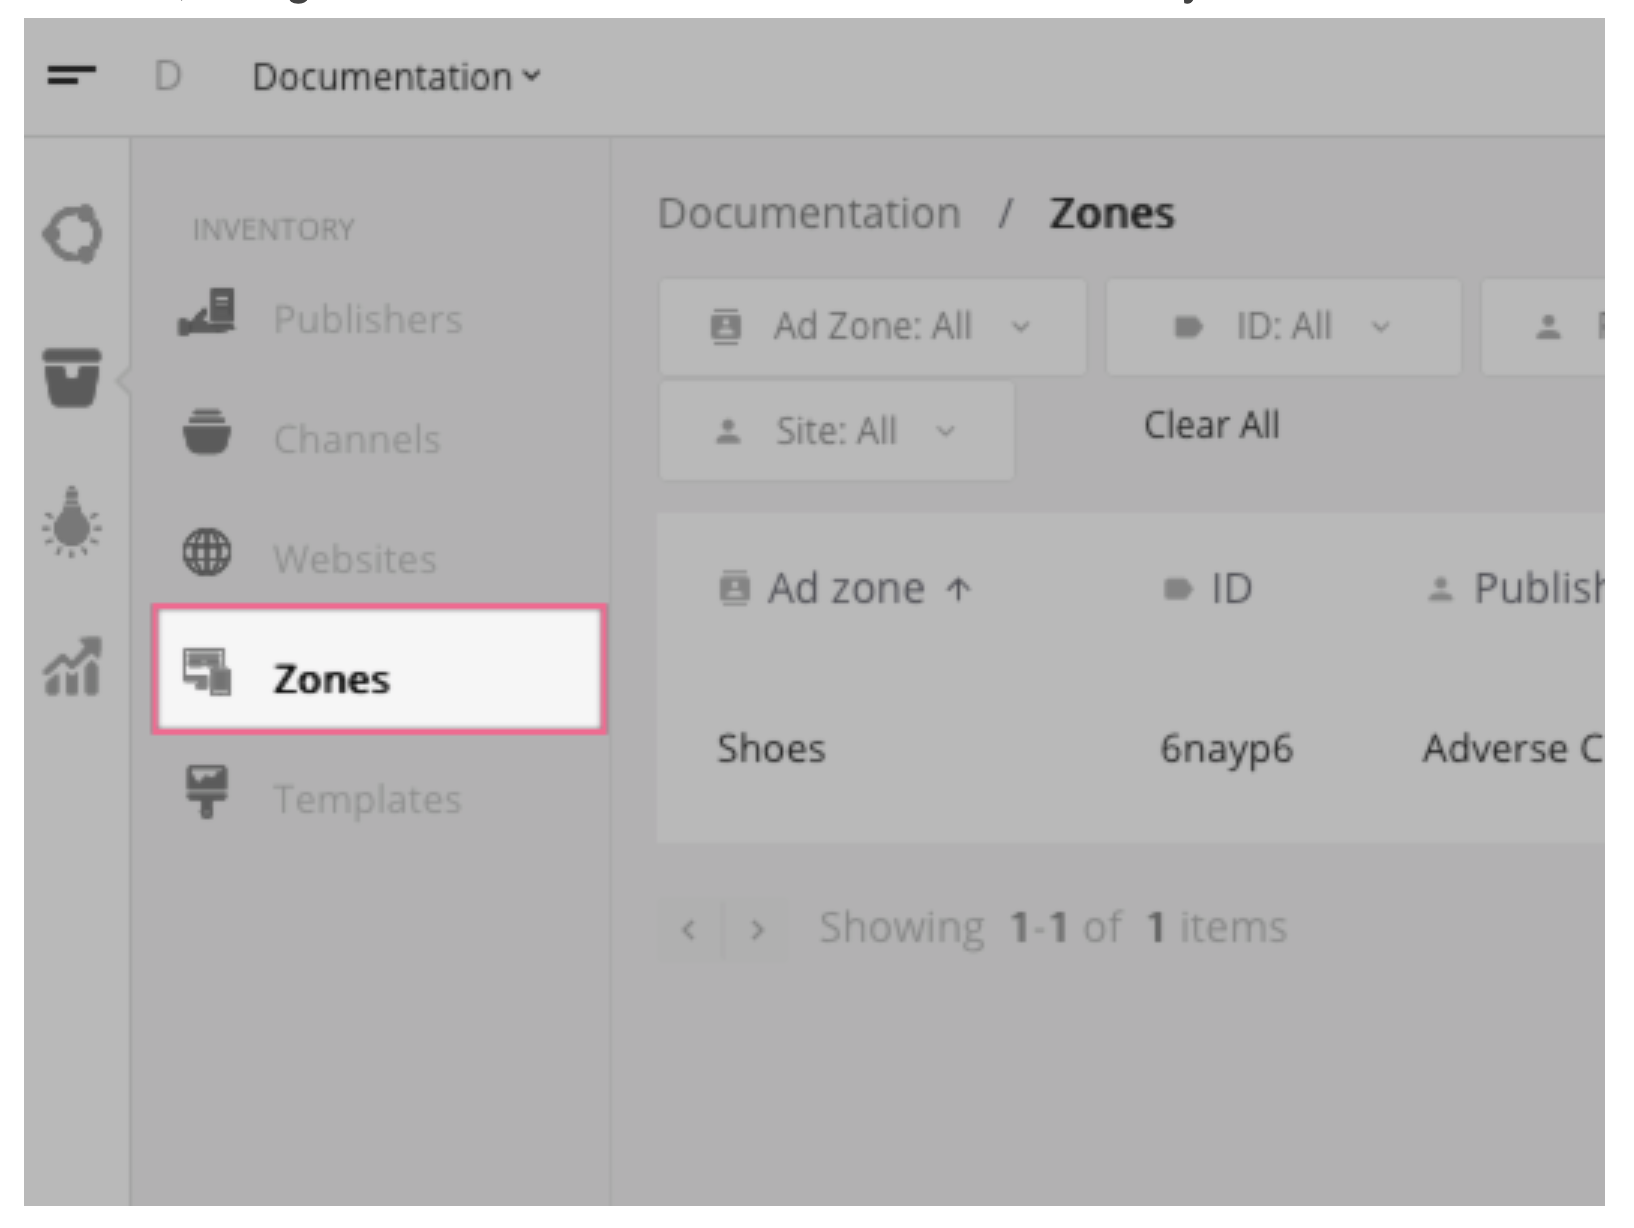
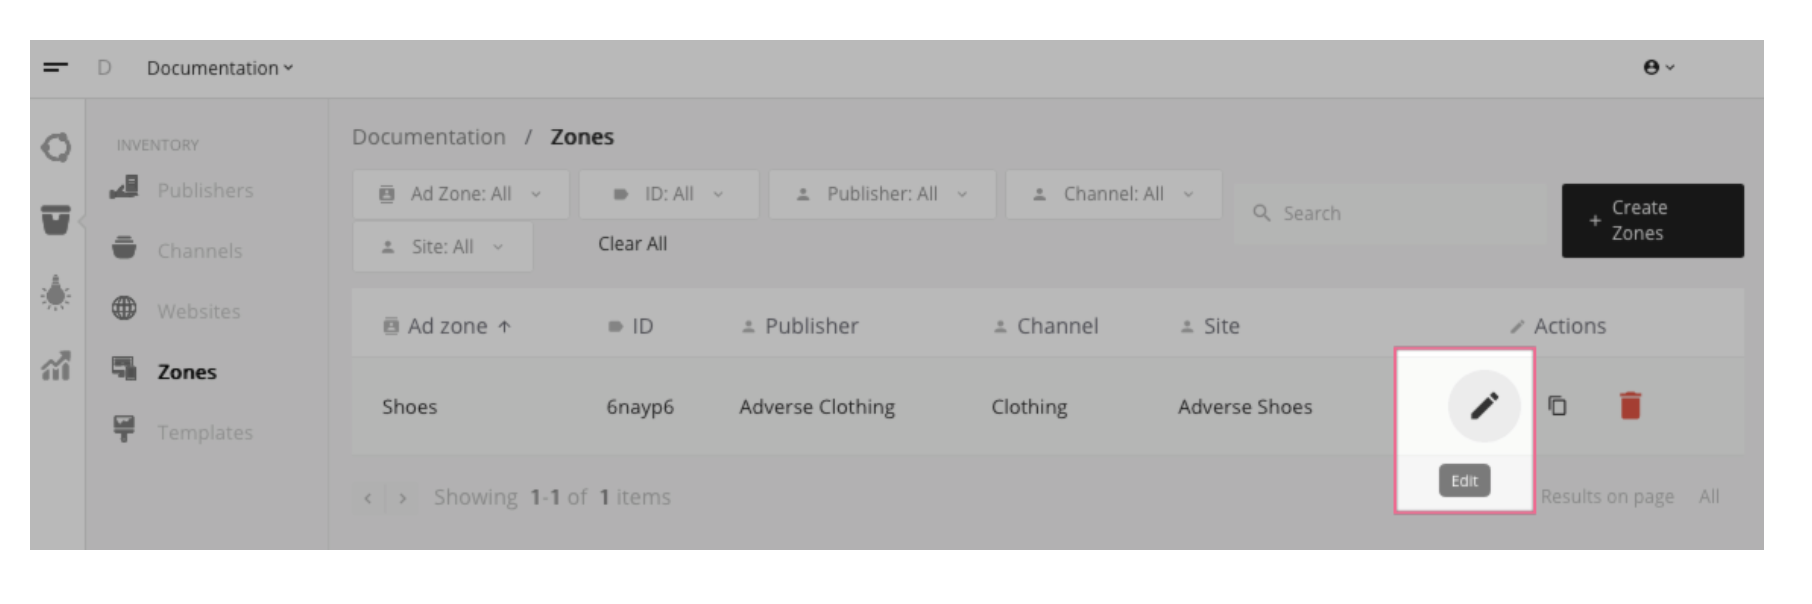
2. Next you will select the "Edit" icon from the action menu:
 3. Then you will add our edited Cake conversion URL to the postback pixels.
Here is the edited URL from above:
https://trk.exampleurl.com/p.ashx?o=123&e=543&f=p&r={{reqid}}&t={{clickId}}
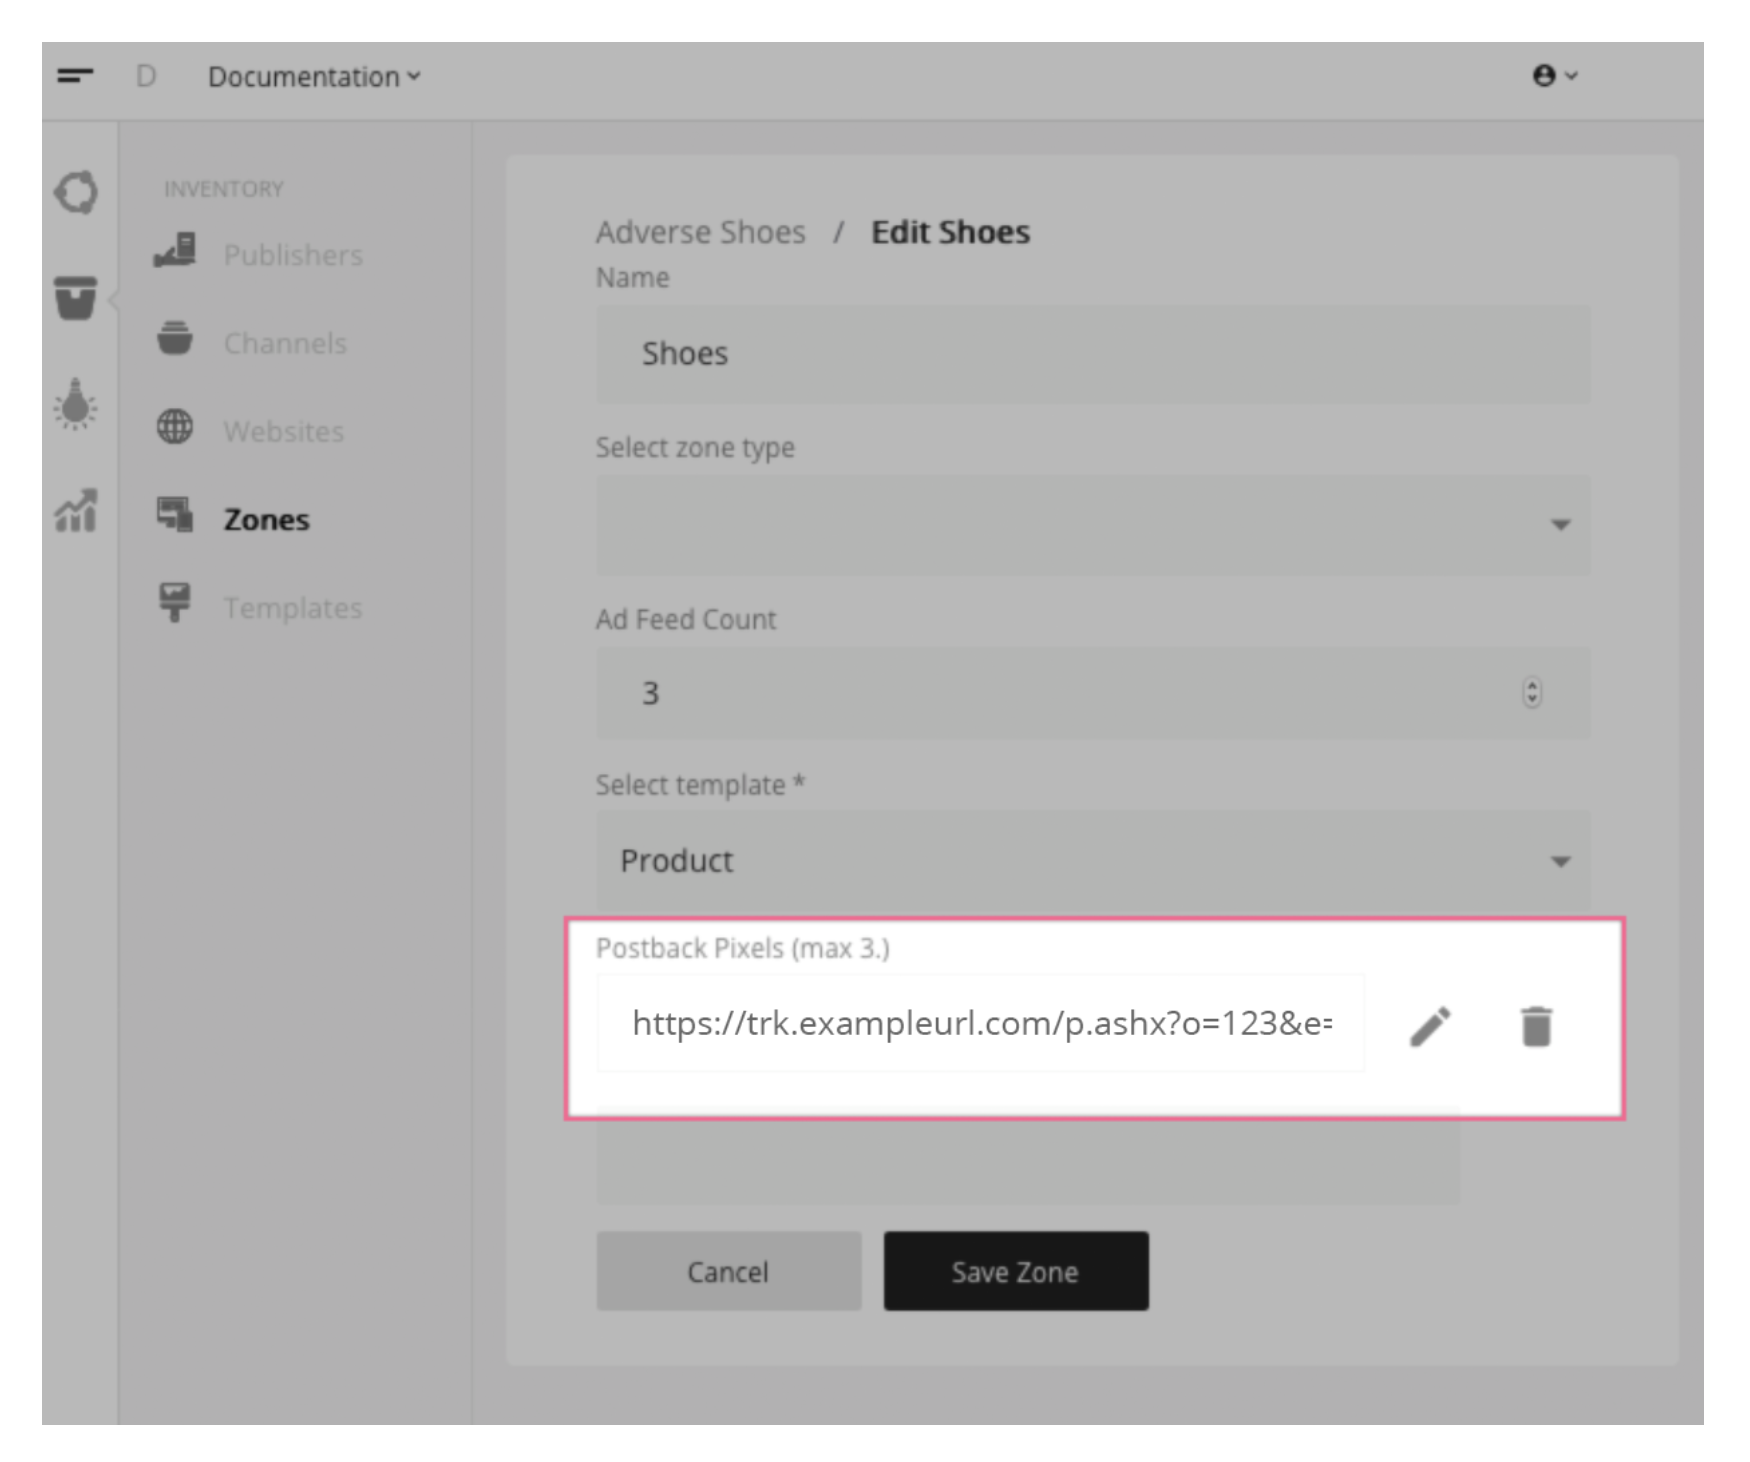 This will be the same as what was displayed in Cake. The difference is we will replace the values with the appropriate Lincx macros.
For our Lincx macros, we set REQUEST_SESSION_ID to {{reqid}} and set t=TRANSACTION to t={{clickId}}
At this point, any conversion will propagate through Cake, and Affiliates will see the proper reporting.
Appendix: Setting up for multiple conversions/events
To begin setting up for multiple conversions/events, you are going to need to configure the Landing Page URL.
To illustrate, let’s say that you are hosting the Lincx zone on the following URL:
https://yoursite.com/some/path
Next, we are going to need to pass values as tokens through to Lincx. Lincx will store any named query parameters in the URL if they are prefixed with “lincx-”.
For example, if we want Lincx to store “123” as the value of “s1” whenever a visitor lands on the Lincx zone, we would need to make sure that their URL would look like this:
https://yoursite.com/some/path?lincx-s1=123
Using this knowledge, we can leverage Cake tokens to dynamically insert the values that we are interested in. Namely, the Affiliate ID and the Request ID.
Here’s an example:
https://yoursite.com/some/path?lincx-s1=#affid#&lincx-reqid=#reqid#
In the above example, you are making your Affiliate ID available to Lincx as “s1” (a default dimension in Lincx reporting) and Request ID available as “reqid” (we’ll need this for conversion tracking).
https://support.getcake.com/support/solutions/articles/5000546121-how-do-i-track-events-